![ChatGPT Image Jul 14, 2025, 03_46_31 PM.png]](https://info.rideto.com/hs-fs/hubfs/ChatGPT%20Image%20Jul%2014%2c%202025%2c%2003_46_31%20PM.png?width=50&height=50&name=ChatGPT%20Image%20Jul%2014%2c%202025%2c%2003_46_31%20PM.png)
🎬 Video Tutorial
Table of Contents
1. Adding a Course to Your Calendar
2. Setting Up Recurring Courses
3. Editing Course Details
4. Canceling Courses
5. Adding Events
Adding & Managing Courses
Keeping your course schedule up to date is key to maximising bookings—any course you add here appears instantly on RideTo.com and in your booking widget.
1. Adding a Course to Your Calendar
| Step | Action |
|---|---|
| 🗓 1. Select Date | Click the desired date in the calendar view or use 'Add Course" button on (bottom-left) |
| ➕ 2. Add Course | Click the “Add Course” button (top-right) |
| 📋 3. Fill Course Details | Date, Location, Course type (default: CBT) |
| 🎯 4. Capacity | Enter max number of spaces available for the course |
| 👤 5. Assign Staff | Select an instructor from the available list |
| ⏰ 6. Timing | Set start time & estimated end time |
| 📝 7. Notes | Add special instructions or preferred instructors |
| 🏍️ 8. Bikes | Choose number of available bikes for the course |
| 💾 9. Save | Click “Add Course” — your site & widget update instantly! |
ℹ️ Your RideTo.com page and booking widget will update instantly and automatically with the new course and available spaces.
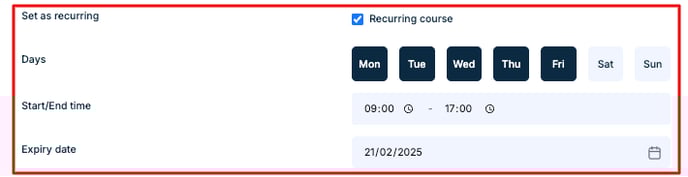
2. Setting Up Recurring Courses
Adding each course individually can be time-consuming and risks missing bookings. Instead, create weekly recurring courses by following these simple steps:
ConnectMCT - Adding Recurring Course - Watch Video
On Add Course Form;
| Step | Action |
|---|---|
| 🔁 1. Enable Recurring | Check “Set as recurring” |
| 📅 2. Select Days | Pick weekdays for repetition |
| ⏰ 3. Set Times | Define start & end times |
| 📆 4. End Date | Choose when the series stops |
| 📝 5. Complete Details | Fill in any remaining fields |
| 💾 6. Save | Click “Add Course” — all occurrences publish automatically |
✅ Pro Tip: Use recurring courses for weekly/monthly sessions to save time.
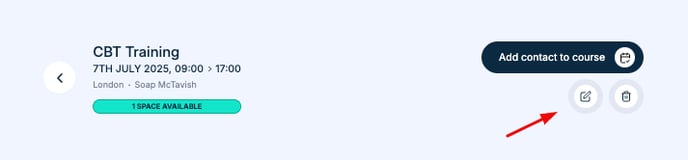
3. Editing Course Details
You can amend spaces, change the course type or reassign instructors without creating a new course:
-
Select Course – Click on its block
-
Edit Icon – Hit the pencil/edit icon (top-right)
-
Modify Details – Update spaces, instructor, date, or type
-
Save Changes – Click “Save”
4. Canceling Courses
If you need to cancel a course, you can follow the steps below—just be sure there are no bookings on it before you delete it.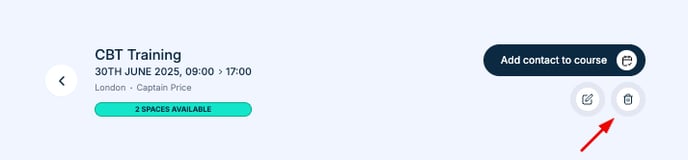
| Step | Action |
|---|---|
| 🖱 1. Select Course | Click the course block on the calendar |
| 🔍 2. Verify | Ensure no confirmed orders exist |
| 🗑 3. Delete | Click the delete icon (top-right) |
| ✅ 4. Confirm | Click “Confirm” when prompted |
❗ Note: Courses with any bookings cannot be deleted.
📅 Managing Events
Events are internal calendar functions that don't appear on RideTo.com or your booking widget. They're excellent for managing day-to-day business operations.
5. Adding Events
Use concise, clear titles, custom colours, and detailed notes to keep your events organised and effective.
For example, assign yellow to recurring team meetings and purple to monthly motorcycle maintenance so you can spot key dates at a glance.
| Step | Action |
|---|---|
| 🗓 1. Select Calendar | Click Calendar |
| ➕ 2. Add Event | Click “Add Event” (bottom left) |
| 📅 3. Select Date | Click on the desired event date |
| 📝 4. Event Details | Enter title, start/end times, and any notes |
| 💾 5. Save | Click “Add Event” to create the event |
💡 Best Practices:
-
Use short, clear titles
-
Pick distinct colours for each event type
-
Add detailed notes for context
-
Follow a consistent colour-coding system