![ChatGPT Image Jul 14, 2025, 03_46_31 PM.png]](https://info.rideto.com/hs-fs/hubfs/ChatGPT%20Image%20Jul%2014%2c%202025%2c%2003_46_31%20PM.png?width=50&height=50&name=ChatGPT%20Image%20Jul%2014%2c%202025%2c%2003_46_31%20PM.png)
🎬 Video Tutorial
Table of Contents
1. Bike Table Overview
2. Adding New Bikes
3. Editing Bike Details
4. Adding Bike Notes & Documentation
5. Adding Bike to Course
1. Bike Table Overview
The Bike Management allows you to efficiently manage your school's motorbike inventory. This system enables you to register, track, maintain, and monitor usage information for all bikes from a central location.
Key Features:
- Register detailed info for each bike
- Track Status: Active · At Risk · Out of Order
- Manage Dates: MOT, tax, service intervals and receive e-mail remainders
- Log Damage Reports with notes & photos
Bike Table Overview
Bike table shows key details like registration, make/model, site location, engine size, transmission type, tax and MOT expiry dates — with quick access to view or edit each bike.

💡 Tip: Click any row to see full bike details, or use the Actions links for quick access.
🚦Understanding Your Bikes Status Labels:
| Status | Criteria |
|---|---|
| 🟢 Active | Valid docs, no outstanding issues |
| 🟠 At Risk | Upcoming expiry |
| 🔴 Expired | Lapsed MOT/tax or out of order inventory |
2. Adding New Bikes
The DVLA Vehicle Check feature allows you to fetch and save official vehicle details directly from the UK’s Driver and Vehicle Licensing Agency (DVLA). It ensures your bike records are accurate, compliant, and that MOT/tax dates are always up to date.
When to use it
- Adding a new bike into Connect.
- Updating an existing bike record before assigning it to courses.
How to use
| Step | Action |
|---|---|
| 🔘 1. Add Bike | Click “Add Bike” at bottom of list |
| 🏷 2. Registration Plate | Enter plate number |
| 🏭 3. Click Fetch from DVLA. | Checks DVLA records automatically |
| ⚙️ 4. Review Information | Check records, manually edit |
| 📍 5. Location | Assign to a training site |
| 🔖 6. Status | Set to Active (default) |
| 💾 7. Save | Click “Save” to register |
What happens next
-
The information is stored against the bike record.
-
MOT and tax expiry dates automatically generate reminder emails before expiry.
3. Editing Bike Details
-
Select Bike → View details
-
Click “Edit Bike”
-
You Can Update Following Fields:
📅 Important Dates
| Field | Description |
|---|---|
| MOT Expiry | Date MOT certificate lapses |
| Tax Expiry | Vehicle tax renewal date |
| Last Service | Most recent service date |
⚠️ Important: Ensure accuracy—this data drives tax, maintenance alerts. You'll be notified for expiry dates.
💰 Financial Info
Purchase price · Current value · Insurance details
🔧 Technical Info
VIN · Chassis number · Mileage · Color
4. Adding Bike Notes & Documentation
Staff and admins can attach notes and documents to each bike—schools typically use this to record accident damage, log service history, and store important documentation.
example use: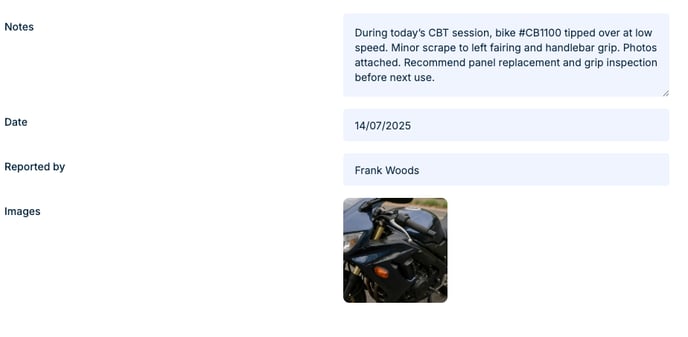
Store and manage:
-
📝 Notes and comments
-
📜 Service Records
-
📸 Photos and attachments
5. Adding Bike to Course
Using this feature, you can track exactly which bike is used in each course and by whom. After adding your bikes to the inventory, head to Calendar > Courses to assign them to sessions.
-
Assign to Course: From course block, click “Add Bike” and select available machine.
-
Track Usage: See which bike is used on which date & by whom.