![ChatGPT Image Jul 14, 2025, 03_46_31 PM.png]](https://info.rideto.com/hs-fs/hubfs/ChatGPT%20Image%20Jul%2014%2c%202025%2c%2003_46_31%20PM.png?width=50&height=50&name=ChatGPT%20Image%20Jul%2014%2c%202025%2c%2003_46_31%20PM.png)
🎬 Video Tutorial
Table of Contents
1. Adding Direct Orders
2. Changing a Customer’s Training Date
3. Moving Customers Between Venues
4. Removing Orders
5. Adding Bikes to Orders (Pro Tier)
1. Adding Direct Orders
You can swiftly add walk-in or telephone bookings to your calendar – it may feel like extra work, but it significantly boosts customer satisfaction and markedly reduces your administrative burden over time.
💡 Why Use Connect For Direct Orders?
🔔 Auto notifications: Riders get email/SMS confirmations and remainders.
⚙️ Efficiency: Keeps your schedule & staff assignments up to date.
🎓 Certificates (Pro Feature): You can use CBT certificates and submit them Automatically to DVSA.
| Step | Action |
|---|---|
| 🗓 1. Select Course | Click the desired course block in your calendar |
| ➕ 2. Add Contact | Click “Add Contact” |
| 👥 3. Choose Contact | Select an existing rider or “Add New Contact” |
| 📝 4. Enter Details | Fill in rider info & payment status |
| ✅ 5.Confirm | Click “Add Rider to Course” |
⚠️ RideTo.com and your widget will automatically update with remaining spaces, and the customer will receive email confirmation.
*Use add contact buttons to add direct orders with few clicks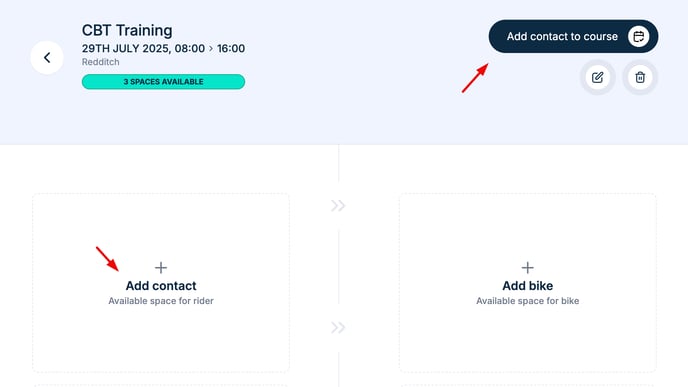
2. Changing a Customer’s Training Date
You can change the date of both Direct or Widget and RideTo orders on Connect.
Changing a RideTo order will resend the confirmation email and update our systems, however please ensure you email hello@rideto.com when you amend an order as it doesn't update any payment which might need to be managed by our team.
| Step | Action |
|---|---|
| 🗓 1. Select Course | Click the original course block |
| 📦 2. Select Order | Click on the specific rider’s booking |
| 📆 3. Change Date | Scroll to “Course Date” and pick a new date |
| ⏰ 4. Adjust Time (opt.) | Modify start time if needed |
| 💾 5. Save | Click “Save” — confirmation email is resent automatically |
3. Moving Customers Between Venues
You can change training location and date/time for your existing customer.
Steps
-
Open the course from Calendar, then open the rider’s contact.
-
Change Location first.
-
Update Date/Time if needed.
-
Save.
What happens next
-
The rider receives an updated confirmation email (and SMS, if enabled).
-
The order reflects the new site/date/time; capacity is released from the original course.
4. Removing Orders
❗Note: Only Direct and Widget orders can be removed here. For RideTo-created bookings, contact hello@rideto.com.
Follow following steps to remove booking
| Step | Action |
|---|---|
| 🗓 1. Select Course | Click the course block in your calendar |
| 📦 2. Select Order | Click on the booking you wish to delete |
| 🗑 3. Remove | Click “Remove from Course” |
| ✅ 4. Confirm | Click “Confirm” when prompted |

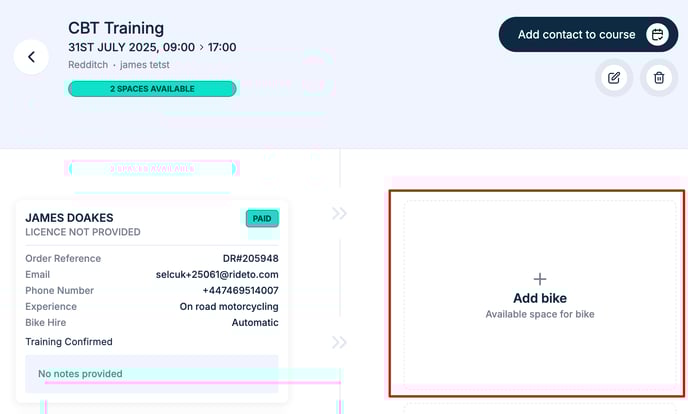
5. Adding Bikes to Orders (Pro Tier)
Pro-Tier Feature: Track and assign specific bikes to each course and student.
⚙️ Benefits:
• Full inventory control
• Usage logs & maintenance scheduling
• Incident documentation with notes/images
| Step | Action |
|---|---|
| 🗓 1. Select Course | Click on the course slot |
| ➕ 2. Add Bike | Click “Add Bike” |
| 🏷 3. Choose Bike | Pick from your inventory list |
| ✅ 4. Confirm | Click “Add” to assign the bike |
*Add Bike Screen on Course Page