![ChatGPT Image Jul 14, 2025, 03_46_31 PM.png]](https://info.rideto.com/hs-fs/hubfs/ChatGPT%20Image%20Jul%2014%2c%202025%2c%2003_46_31%20PM.png?width=50&height=50&name=ChatGPT%20Image%20Jul%2014%2c%202025%2c%2003_46_31%20PM.png)
In this guide, you'll learn how to customise your widget, add course descriptions, display Google reviews, manage multiple locations and embed bookings directly into your own website.
🎬 Video tutorial: Coming soon
Table of Contents
1. What's new
2. Setting up your widget
3. Adding course descriptions
4. Google reviews
5. Managing multiple locations
6. Embedding the widget on your website
7. Frequently asked questions
1. What's new
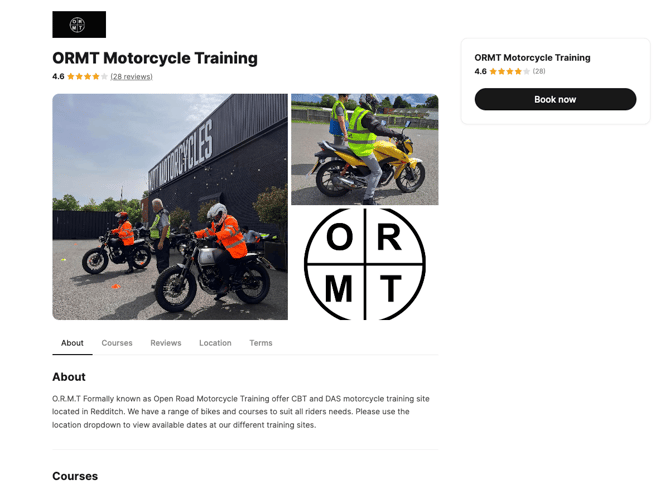
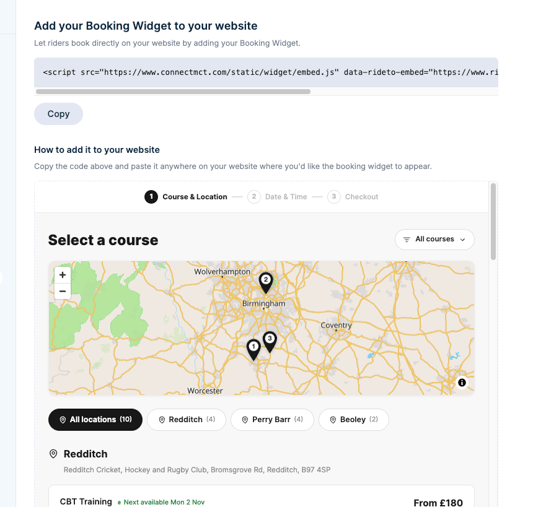
Your booking widget now starts with a storefront that introduces your school before riders choose a course. Riders then follow three simple booking steps:
- Course & Location – choose a course and training location.
- Date & Time – find a suitable booking slot.
- Checkout – enter their details and complete the booking.
You can customise your storefront to help riders get to know your school before they book.
Here's what you can add:
- ⭐ Google reviews: your rating and reviews appear on your storefront.
- 🧑🏫 Instructors: Introduce your team with names, roles and photos.
-
📸 School branding and photos: Add your school logo and up to five training centre photos.
-
📝 Course descriptions: Explain what each course offers in your own words.
-
🪖 What's included and facilities: Highlight the equipment and facilities you provide.
-
📍 Multiple locations: Show your training venues on a map so riders can choose the most convenient one.
- 🌐 Embed on your website: let riders book without leaving your site (Pro Tier 💎).
ℹ️ Good to know: Your existing widget link hasn't changed. Any website buttons or links pointing to your current widget will continue to work.
2. Setting up your widget
All your widget settings are in one place.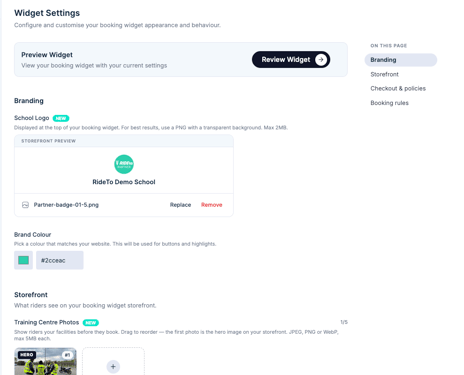
- Go to Settings → Booking Widget → Theme & settings.
- Use the On this page menu to jump to a particular section.
- Click Review Widget at the top of the page to preview your changes as riders will see them.
2.1 Branding
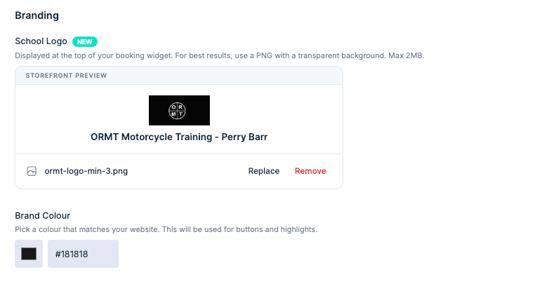
Make your widget match your school's branding.
| Setting | What it does |
|---|---|
| Brand Colour | Sets the colour used for buttons and highlights. Enter the hex code that matches your website. |
| School Logo | Displays your logo at the top of your widget. Upload a PNG, JPEG or WebP file up to 2 MB. A PNG with a transparent background usually looks best. |
2.2 Storefront
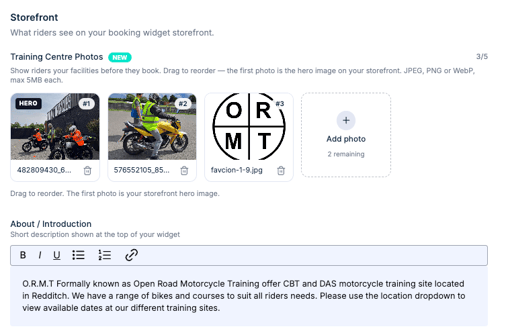
The storefront is where riders first learn about your school. Use it to showcase your facilities, introduce your team and explain what makes your school different.
| Setting | What it does |
|---|---|
| Training Centre Photos | Upload up to five photos in JPEG, PNG or WebP format, up to 5 MB each. Drag and drop them to change the order. Your first photo appears as the main image at the top of the storefront. |
| About / Introduction | Add a short introduction to your school. This appears at the top of your storefront. |
| What's Included & Facilities | Select the equipment and facilities you provide, such as bike hire, helmets, gloves, jackets, on-site parking, an indoor classroom and an on-site café. |
| Instructors | Choose which team members appear on your storefront. All instructors are switched off by default, so you decide who to display. Riders can see each instructor's name, role and photo. |
Adding instructor photos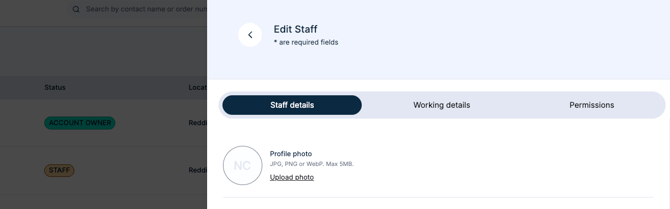
- Go to Staff.
- Find the instructor and click Edit.
- Select Change photo and upload their photo.
If an instructor doesn't have a photo, their initials will be displayed instead.
Saving your changes
- Logo and photo changes are saved automatically.
- Other changes are saved when you click Save in the bar at the bottom of the page.
- Click Discard if you want to undo changes that haven't been saved.
Remember to save your changes before leaving the page.
2.3 Checkout & policies
Use this section to explain your booking policies and decide what information riders need to provide at checkout.
You can add or update:
- Requirements: Explain what riders need before attending a course.
- Cancellation Policy: Set out your cancellation terms.
- Terms of Booking: Explain the terms riders agree to when booking.
You can also enable additional checkout options:
| Option | What it does |
|---|---|
| Additional T&Cs Pop up | Requires riders to read and accept your Terms of Booking before paying. |
| CBT Renewal Field | Allows riders to indicate whether they're renewing their CBT. |
| 3rd Party Opt-In | Asks riders for permission to receive third-party marketing. |
| Emergency Contact Collection | Requires riders to provide an emergency contact number. |
| Licence Number | Requires riders to enter their driving licence number during checkout. |
Only enable the options you need for your booking process.
2.4 Booking rules
Booking Cut-Off Time
Set the latest time riders can book a course for the following day. This helps you manage how much notice you need before a booking.
Check your cut-off time to make sure it reflects your school's booking requirements.
3. Adding course descriptions
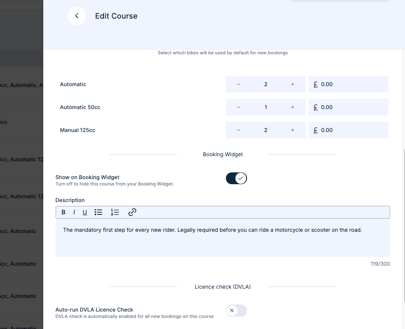
Course descriptions help riders understand what each course involves before choosing a booking.
You can customise the description for each course at each location.
How to add a description
- Open Courses: Select Courses from the sidebar.
- Edit a course: Click Edit next to the relevant course at the location you want to update.
- Add your description: Find the Storefront section and enter a description of up to 300 characters.
- Choose whether to display it: Keep Show on storefront switched on to display the course, or switch it off to hide it from your widget.
- Save: Click Save to apply your changes.
Good to know: Descriptions and visibility are managed separately for each location. If you offer the same course at multiple venues, you can use a different description for each one.
4. Displaying Google reviews
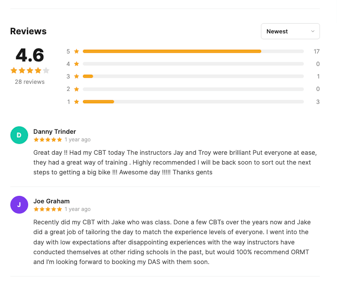
Your storefront can display your school's Google rating, review count and recent reviews.
Reviews refresh regularly, so riders can see an up-to-date view of what other customers think about your school.
If your school doesn't have any Google reviews yet, the reviews section won't appear on your storefront.
Can't see your reviews?
Contact the Connect support team for help checking your Google Business Profile connection.
5. Managing multiple locations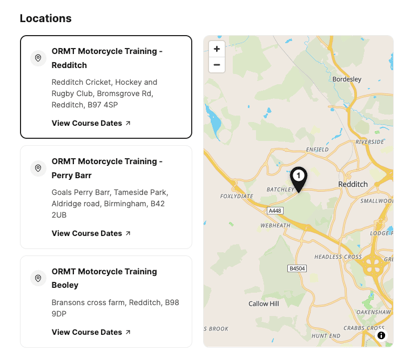
If your school operates from more than one training location, your storefront helps riders find the venue that suits them best.
Your storefront displays:
- Each venue and its address.
- A View Course Dates button for each location.
- A map with numbered pins showing your venues.
During the Course & Location step, riders can select a venue on the map to see the courses available at that location.
Set up what's included for each location
You can customise the equipment and facilities displayed for each venue.
- Go to Settings → Booking Widget → Theme & settings.
- Find What's Included & Facilities.
- Use the location selector to choose a venue.
- Select the facilities and equipment available at that location.
- Click Save to apply your changes.
Repeat these steps for each location you want to customise.
Tip: Check the facilities at every venue carefully. Equipment or amenities available at one location may not be available at another.
6. Embedding the widget on your website
Available with Connect Pro.
You can embed the booking steps directly into your own website, allowing riders to book without navigating away from your site.
Don't have Connect Pro yet? Start your free Connect Pro trial to access this feature.
Step 1: Open Embed Widget
In Connect, go to Settings → Booking Widget → Embed Widget.
Step 2: Copy your embed code
Click Copy to copy the code generated for your school.
You don't need to edit the code.
Step 3: Add the code to your website
Paste the code into the page where you want the booking widget to appear. For example, you could add it to your homepage or a dedicated Book now page.
Here are some common website builders:
| Website builder | Where to add the code |
|---|---|
| WordPress | Add a Custom HTML block and paste the code. |
| Wix | Go to Add → Embed Code → Embed HTML, then paste the code. |
| Squarespace | Add a Code block and paste the code. |
| Other websites | Add the code to the relevant page's HTML, or ask your website administrator for help. |
Step 4: Test your booking flow
Open the page on your website and run through the booking steps to check everything works as expected.
Commission: Bookings made through your own website, whether riders use an embedded widget or a link to your widget, carry no RideTo commission. Standard Stripe fees still apply.
7. Frequently asked questions
Has my booking widget link changed?
No. Your existing widget link remains the same, so any buttons or links on your website will continue to work.
Do I need to set everything up straight away?
No. Sections you haven't completed are simply hidden from riders. You can customise your storefront over time, starting with your school logo, photos, instructor profiles and facilities.
Why isn't an instructor appearing on my storefront?
Check that the instructor is switched on under Instructors and that you've clicked Save. The instructor must also have an active Connect account.
Can I embed my booking widget without Connect Pro?
No. Embedding is a Connect Pro feature. You can still add a link or button to your existing widget on your website without embedding it.
Do embedded bookings carry commission?
No. Bookings made through your own website carry no RideTo commission, whether the widget is embedded or riders follow a link to it. Standard Stripe fees still apply.
Does the widget work on mobile?
Yes. Your booking widget and embedded booking steps work on mobile phones, tablets and desktop computers.
Why can't I see my Google reviews?
If your school has Google reviews but they aren't appearing on your storefront, contact the Connect support team to check your Google Business Profile connection.
Where can I preview my changes?
Go to Settings → Booking Widget → Theme & settings and click Review Widget at the top of the page.
Need more help?
If you need a hand setting up your booking widget, get in touch with our team.
- Live Chat & WhatsApp: 020 3603 9652
- Support hours: 08:30–17:00, 7 days a week
- Email: support@connectmct.com
- Partner Line: 0333 050 726