![ChatGPT Image Jul 14, 2025, 03_46_31 PM.png]](https://info.rideto.com/hs-fs/hubfs/ChatGPT%20Image%20Jul%2014%2c%202025%2c%2003_46_31%20PM.png?width=50&height=50&name=ChatGPT%20Image%20Jul%2014%2c%202025%2c%2003_46_31%20PM.png)
🎬 Video tutorial: Coming soon
On this page- What are Add-Ons?
- Creating an Add-On
- Assigning Add-Ons to Courses
- What Riders See
- Payments, Orders & Refunds
- Managing Your Add-Ons
- Frequently Asked Questions
1. What are Add-Ons?
Add-ons let riders purchase extras, such as helmet hire, glove hire or insurance, when booking through your booking widget.
Create each add-on once, assign it to the courses you choose, and riders can pay for their course and extras together.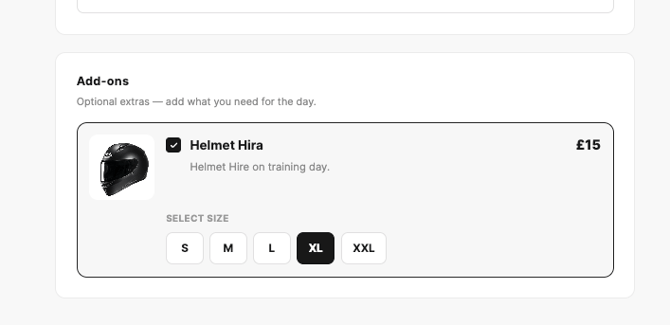
Add-ons are a Connect Pro feature. Start your free Connect Pro trial.
Why use add-ons?
- 💷 Earn extra revenue: Offer additional products or services with your courses.
- 🧾 One payment: Riders pay for their course and add-ons together.
- 🎯 Choose where they appear: Assign add-ons to specific courses.
- ⚙️ Set up once: Reuse an add-on across multiple courses.
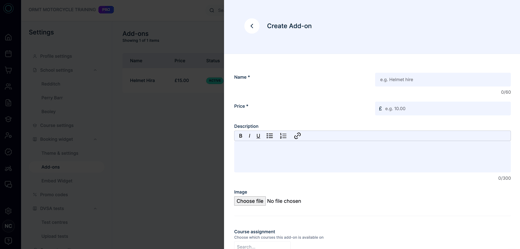
- Open Add-ons: Go to Settings → Booking Widget → Add-ons.
- Create an add-on: Click Create Add-on.
- Add a name: Enter a clear name, up to 60 characters, such as “Helmet Hire”.
- Add a description: Explain what's included in up to 300 characters.
- Set a price: Enter a fixed price in pounds (£), starting from £0.50.
- Choose your options:
- Mandatory: Every rider must purchase the add-on.
- Refundable: The add-on is refunded if the booking is cancelled.
- Active: Makes the add-on available.
- Assign courses: Select the courses where the add-on should appear.
- Save: Click [confirm button label]. Your widget updates straight away.
3. Assigning Add-Ons to Courses
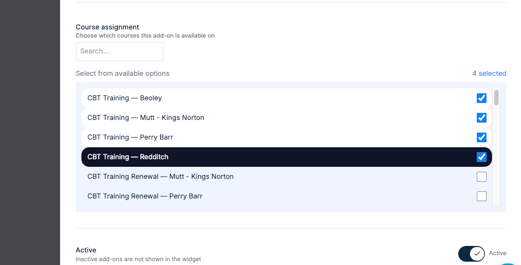
You can assign add-ons when creating or editing an add-on by selecting courses from the course list.
You can also view assigned add-ons in Settings → Course Settings. Each course displays a read-only list of its add-ons, with a Manage add-ons → link to edit them.
Important: Deactivating an add-on removes it from all courses. If you reactivate it later, you'll need to assign the courses again.
4. What Riders SeeOnce you've assigned add-ons to a course, riders can select them during booking.
- An Optional Extras section appears after riders select their date, time and bike, before they book.
- Each add-on displays its name, price, description and a tick box.
- Mandatory add-ons are already selected and labelled (required).
- If a course has more than two add-ons, the list starts collapsed.
- The total price updates as riders select extras, with an itemised price breakdown.
If no add-ons are assigned to a course, the Optional Extras section won't appear.
5. Payments, Orders & RefundsHow payments work
When a rider books a course with add-ons:
- The course and add-ons are charged together in one Stripe payment.
- Payments go into your Stripe account and are included in your normal payouts.
- The order in Connect lists each add-on and its price.
- The rider's confirmation email includes an itemised breakdown.
What happens if a booking is cancelled?
You can refund add on amount directly from your payment panel.
6. Managing Your Add-Ons
The Add-ons page gives you an overview of your add-ons, including their name, price, status and assigned courses.
Use Edit to make changes or Delete to remove an add-on. If an add-on is included in upcoming bookings, you'll see a warning before deleting it.
Downgrading from Connect Pro: Your add-ons are switched off but kept in Connect, ready for when you upgrade again.
7. Frequently Asked QuestionsDo I need Connect Pro?
Yes. Booking Widget Add-Ons are a Connect Pro feature.
Is there a limit on how many add-ons I can create?
No, you can create as many add-ons as you need.
Does RideTo take commission on add-ons?
No. There is no RideTo commission on add-ons sold through your booking widget.
Do add-ons appear on RideTo.com bookings?
This article covers add-ons on your booking widget. They are configured under Settings → Booking Widget → Add-ons.
Need more help?
If you need help setting up or managing add-ons, contact our team.
- Live Chat & WhatsApp: 020 3603 9652 (08:30–17:00, 7 days a week)
- Email: support@connectmct.com
- Partner Line: 0333 050 726